So, we have been doing e-mealz for a year now, and I love it. I love not having to come up with meals for us to eat every night and having the same thing over and over again. I think maybe one meal has been repeated all year and that was okay, because it was one of my favorites. I have repeated some of them myself, because we just loved them that much.
Tonight was one of those nights. I made some really awesome French toast. I am going to give you my variation on it, because the original recipe called for croissants to use for the bread and I just thought that may be way too rich.
Banana Pecan French Toast
French Toast
2 eggs
1/2 c milk
1/2 t cinnamon (I just sprinkled it in until it looked good to me)
1 loaf French bread sliced (I sliced my bread about an inch thick.)
3 T butter (for greasing the pan)
Whisk eggs and milk together. Stir in cinnamon. Butter heated pan. Dip bread in egg mixture on both sides and place in pan. Cook until lightly browned.
Syrup
1/2 c corn syrup
1/2 c maple syrup (I just used our regular syrup. Nothing fancy here.)
1/4 brown sugar
1/2 c chopped pecans
2 bananas, sliced
Heat corn syrup, maple syrup, brown sugar, and pecans in saucepan over medium heat until it starts boiling. Reduce heat and simmer for two minutes. Add bananas and stir to coat. Serve on top of French toast.
Showing posts with label recipes. Show all posts
Showing posts with label recipes. Show all posts
Tuesday, December 6, 2011
Monday, November 7, 2011
Smucker's Peanutty Snack Mix
I found this recipe on the jar of our peanut butter and I thought it sounded good. Since I can't seem to find it online so that I can "pin" it, I am going to save it here.
1/4 cup butter
1/4 cup peanut butter
1 tsp vanilla extract
1 tsp ground cinnamon
4 c honey and nut breakfast cereal
1 cup honey roasted peanuts or roasted peanuts
1 cup mini pretzels
(optional: cayenne pepper to taste) (I would probably leave this out)
1. Heat oven to 350 degrees. Line rimmed baking sheet with foil.
2. Combine butter, peanut butter, vanilla, and cinnamon in a microwave-safe bowl. Microwave on high 35 to 45 seconds, stirring until well blended.
3. Combine cereal, peanuts and pretzels in a large bowl. Pour butter mixture over cereal mixture. Toss well to coat. Spread mixture evenly on baking sheet.
4. Bake 10 to 12 minute, stirring occasionally. Cool. Store in resealable plastic bag.
Friday, May 27, 2011
Two Recipes, One for the Parents, One for the Baby
I have found a fun site called pinterest and because of it I have found all sorts of things I want to try, both recipes and projects. I thought I would share a recipe I found there and one I found on a baby food site that both Coleman and I really liked.
For the parents:
Nutter Butter Banana Pudding Trifle

This is a tasty recipe that includes home made vanilla pudding and whipped cream.
For the Baby
Banana Oat Bars

These were super easy to make and extremely tasty. It was almost like a cookie for a baby. It doesn't include any sugar. I added dried cranberries and golden raisins to our bars. Coleman and I shared one this evening and I think it was a hit.
Sunday, February 21, 2010
Some Recipes
When I posted just a little while ago, I forgot that I had some recipes that I wanted to post as well. I get to writing about Coleman and totally forget everything else, so forgive me.
Yesterday I made these Cinnamon Bun Pancakes. Oh, man, were they good. They tasted like cinnamon buns and pancakes all in one.
Ingredients:
Yesterday I made these Cinnamon Bun Pancakes. Oh, man, were they good. They tasted like cinnamon buns and pancakes all in one.
Ingredients:
- 1-½ cup All-purpose Flour
- 3 Tablespoons White Sugar
- ½ teaspoons Salt
- 4 teaspoons Baking Powder
- 1 Tablespoon Cinnamon
- 2 whole Eggs Beaten
- 1 cup Milk
- 2 Tablespoons Corn Syrup
- ¼ cups Butter, Melted
- 1 Tablespoon Vanilla
Directions:
In medium bowl, combine flour, sugar, salt, baking powder and cinnamon with a whisk. Whisk well to make sure everything is combined.
In separate large bowl, beat together eggs, milk, corn syurp, butter and vanilla. Stir in flour mixture.
Heat a lightly oiled griddle or frying pan over medium/low heat. Pour about 1/4 cup batter onto griddle. Brown on both sides.
Serve warm with icing drizzled over the top.
These were especially easy to make since Jason and I bought our two burner griddle pan. I highly recommend it.
I have been asked a couple times for my chili recipe, so I thought that I would share that as well. I have been known to double and triple this recipe and I usually cook it in the crockpot, but it can be cooked over the stove.
Ingredients:
1 lb. ground chuck or turkey
salt and pepper to taste
2 cans diced tomatoes with garlic and onions
2 small cans tomato sauce
1 TBS chili powder
1 tsp cumin
salsa (any kind. I just pour some in to add a little spice. Maybe 1/2 c to a cup)
Directions:
Brown meat with salt and pepper. Drain.
Add tomatoes, spices, meat, and salsa to a large sauce pan and cook for 20 min or so on medium. (this can also be done in the crock pot)
Serve with Fritos, cheddar cheese, and sour cream. This is also good with basic Jiffy corn muffins if that is what you happen to be craving at the moment.
And finally, I think I am going to make this and surprise Jason when he comes home tonight. I made it at my first Apples of Gold Bible study and Jason said it was the best apple pie he has ever had.
The Mom's Apple Pie to End All Mom's Apple Pies
1/3 c sugar
1/3 cup firmly packed light brown sugar
3 TBS flour
1 tsp ground cinnamon
6 large Granny Smith apples (pared, cored, and sliced)
Short and Tender Pie crust
2 TBS butter
Topping:
1 c lightly spooned all-purpose flour
1/2 c firmly packed brown sugar
1 tsp ground cinnamon
1 stick butter
Directions:
Combine sugar, brown sugar, flour, and cinnamon in large bowl, pressing out any lumps. Add apples and toss well to mix. Pour into pie shell and dot with butter.
Topping: Combine flour, brown sugar, and cinnamon in a small bowl. Cut in butter until mixture is crumbly. Scatter topping thickly over apple filling.
Bake in a 400 degree oven for 30 minutes or until crust and topping are nicely browned. Cool before cutting.
An interesting tidbit about apples, baking apples have rounded bottoms (think Granny Smith) while eating apples have more pointed bottoms (think Red Delicious). You can eat baking apples, but it isn't good to bake with eating apples. Now you know. :)
Pie Crust Recipe
1 3/4 cups sifted all-purpose flour
1 TBS sugar
1/2 tsp salt
1/2 c shortening
3 to 4 TBS cold water
Combine dry ingredients in a medium-sized mixing bowl. Cut in shortening with a pastry blender until fine crumbs form. Add water a tablespoon at a time, mixing briskly with a fork just until pastry holds together. Do not over mix or pastry will toughen. Roll out on floured surface to a 13-in round. Fit into a 9-in pie plate. trim overhang to 1 inch; turn under flush with rim. Pinch to make the crust edges fluted.
I just remembered that I used all of my cinnamon yesterday for the pancakes, so unless Jason stops by the store on his way home, we won't be having apple pie this evening. Oh, well.
Sunday, October 25, 2009
Jason's Banana Pecan Pancakes
Jason is kind of the breakfast maker in our house. He will get up and make biscuits from scratch along with eggs and bacon. This morning, he made Banana Pecan Pancakes. He got the recipe from our favorite Betty Crocker cookbook.
Here it is:
2 large eggs
2 c. all purpose flour
2 c. milk
2 c. mashed ripe bananas (4 medium bananas)
1/4 c packed brown sugar
1/4 c vegetable oil
2 teaspoons baking powder
1 teaspoon baking soda
1/2 teaspoon salt
1 c. chopped pecans (if you aren't much of a nut lover, like me, you can use less)
1. Beat eggs in medium bowl until fluffy. Beat in remaining ingredients except pecans just until smooth. Stir in pecans.
2. Heat pan over medium heat. Pour slightly less than 1/4 c. batter onto hot griddle. Cook pancake until puffed and dry around edges. Turn and cook until golden brown.
Lucky for you that Jason did the cooking, because he takes pictures of the things he cooks. Enjoy!

Thursday, September 10, 2009
Good Old Betty Crocker
Have I ever mentioned what my favorite cookbook is? My favorite cookbook is this: I have no idea if the original "Big Red Cookbook" is exactly the same, but this edition has to be my favorite. My mother-in-law gave this book to me on my wedding day. I think she wanted to make sure her son was well fed. From the start, this has been my go to book when I need to learn how to make something. When Jason suggested that "we" needed to learn how to make mashed potatoes, I used this book. From it I learned that once you drain the cooked potatoes, you should return them to the pot on the stove to steam off any excess water so that your potatoes are nice and fluffy. This book includes pictures and helpful hits if your food doesn't end up exactly the way it is supposed to. I have cooked many things from this book. If there is ever something seemingly basic (like biscuits or mashed potatoes) that I don't know how to cook, I can be assured that this trusty cookbook will have it in it.
Well, now you know my little secret. I follow directions really well and if you have ever had my chili, the base of it comes from this cookbook. I just tend to add some other stuff in. :)
If you know someone getting married soon, definitely try to pick this one up. Unfortunately, I don't think it is in print anymore, but you can get it on Amazon for less than $10.
Without further ado, a couple recipes that I have made recently. (all from Betty Crocker)
Baking Powder Biscuits
2 cups all-purpose flour
1 TBS sugar
3 tsp baking powder
1 tsp salt
1/2 cup shortening
3/4 cup milk
1. heat oven to 450 degrees
2. Mix flour, sugar, baking powder, and salt in medium bowl. Cut in shortening using pastry blender or two knives, until mixture looks like fine crumbs (Jason edit: make sure all of the dry ingredients are mixed well before adding the shortening) Stir in milk until dough leaves side of the bowl. (dough will be soft and sticky)
3. place dough on lightly floured surface. (I more than lightly floured mine, because the dough was so sticky, I'm not sure what Jason does) Knead lightly 10 times. Roll or pat 1/2 inch thick. Cut with floured 2 to 2 1/4 inch round cutter (we use one of our juice glasses). Place on ungreased cookie sheet about 1 inch apart for crusty sides, touching for soft sides.
4. Bake 10 to 12 minutes (longer if you are using stoneware) or until golden brown. Immediately remove from cookie sheet. Serve warm.
*note on making biscuits. This is something I learned this week, because I made these for the first time. Jason usually makes our biscuits. Jason says that you want to roll out the dough to the thickness that you want the biscuits to be. They don't rise a whole lot. This may be something everyone else knows, but I didn't, so I made very thin little biscuits. We used them as the tops and bottoms of our breakfast sandwiches.
White Chocolate Macadamia Nut Cookies
1 cup packed brown sugar
1/2 cup granulated sugar
1/2 cup butter, softened
1/2 cup shortening
1 tsp vanilla
1 large egg
2 1/4 cups all purpose flour
1 tsp baking soda
1/4 tsp salt (I used 1/8 tsp, because my nuts were salted and I didn't want my cookies to be too salty)
1 pkg (6 oz) white baking bars cut into 1/4 to 1/2 in chunks (I used white chocolate chips)
1 jar (3 1/2 oz) macadamia nuts, coarsely chopped (I had a bag of the nuts, so I measured about 4 oz in a measuring cup and then chopped those up. It seemed like enough)
1. Heat oven to 350 degrees.
2. beat sugars, butter, shortening, vanilla, and egg in large bowl with electric mixer on medium speed until light and fluffy, or mix with spoon. Stir in flour, baking soda, and salt (dough will be stiff.) Stir in white chocolate and nuts.
3. drop dough by rounded tablespoonfuls about 2 inches apart onto ungreased cookie sheet.
4. bake 10 to 12 minutes or until light brown. Cool 1 to 2 minutes, remove from cookie sheet to wire rack.
Jason said these tasted like they should be in a bakery or that you could sell them. They really are good.
Tuesday, September 1, 2009
A Spaghetti I Actually Liked!
So, I have never really liked spaghetti. I like pasta and tomato sauce is okay, but I have never really liked the whole spaghetti combination together. Poor Jason does like spaghetti and I won't make it for him. Well, since I have been able to be at home in the evenings and I have been cooking dinner almost every night I have been trying to come up with new things to make. Well, I found a recipe for creamy chicken spaghetti. I decided to try it. Good news for Jason is that I actually liked what I made.
Here it is from my head:
1 lb. chicken diced
1/4 c. Italian dressing
2 c. pasta sauce
1/2 block low fat cream cheese
spaghetti (I used wheat pasta and I couldn't tell a difference)
1. Cook the spaghetti
2. In a pan heat the Italian dressing.
3. Add the chicken.
4. Once the chicken is cooked, add the pasta sauce and cream cheese.
5. Cook until cheese is melted.
6. Serve with Parmesan cheese on top
I think I liked this better because it was creamy. I really like any kind of cheese too, so that probably made it better to me.
Last night we also had strawberry cake. I will have to post that recipe another time, because I don't want to get up and get it. Just know that it is one of Jason's favorite desserts and it is super easy and yummy.
Sunday, August 16, 2009
Mmm Fudge
Yesterday, Jason visited his cousin in Rome and while there ate some fudge that his aunt had made. So, in addition to the three books he brought me to read, he also brought me the recipe for the fudge. Well, since he said that the fudge was so good, I made it today. I think we are going to take it with us to our Journey group tomorrow. I am also thinking about making some more to take to school tomorrow. We'll see, because I also have made granola and I oatmeal cookies today and I still have to cook dinner. It doesn't take long to make though, so we'll see.
Without further ado, fudge.
Yvonne's Fudge Recipe
1 lb. Confectioners Sugar
(3 1/2 cups for those of you who would like to know and whose husbands come home with a 2 lb bag)
1/2 cup cocoa
1/4 teaspoon salt
6 tablespoons butter or margarine (melted)
4 tablespoons of milk
1 tablespoon vanilla extract
1 cup chopped pecans (I don't really like nuts in things, so this is optional. I added some chopped walnuts on the top of half of the fudge after I put it in the pan for those who like that type of things)
Directions: Combine all ingredients except nuts and vanilla in saucepan. Stir. Heat on stove until mixture turns from dull to shiny (it will also get thinner). Add vanilla and nuts (optional) and stir. Remove from heat and pour into buttered pan to set.
There it is. Easy as can be. I'm sure it will taste as good as it looks.
Monday, August 3, 2009
Homemade Granola
Since this is my last week of freedom before school starts back, I am using my time doing all sorts of things that I don't usually do during the school year (I am hoping to do more cooking during this school year, because I will have a lot more time). On my list today is homemade granola. Jason bought a huge thing of yogurt and we have a ton of fruit, so what is better with that than granola? I used a new recipe website to find an easy granola recipe. I picked it, because I had everything in my kitchen already. I am going to need to buy more oatmeal soon, because I have gone through a huge thing in about two weeks. The website I used is called Tasty Kitchen. People can post recipes. There were numerous granola recipes, but I chose to make Basic Granola. From the smell of what is cooking currently, I think this recipe is going to be a winner. I already ate some of the uncooked granola and it was excellent. So, here is the recipe.

Basic Granola
Added by angelinthekitchen on July 30, 2009 in Breakfast
| Prep Time 5 Minutes Cook Time 45 Minutes | Servings 8 | Difficulty Easy |
Ingredients
- 4 cups Old Fashioned Oats
- ½ cups Chopped Pecans
- ¾ cups Slivered Almonds
- ¾ cups Brown Sugar
- ¼ cups Water
- 2 teaspoons Vanilla Extract
- ½ teaspoons Table Salt
Preparation Instructions
1. Preheat oven to 250 degrees. Line two large sheet pans with parchment paper.
2. Combine oats and nuts in a large bowl.
3. In a small, microwavable bowl, combine sugar, water, vanilla, and salt. Microwave on high 2-3 minutes, or until sugar is dissolved and the mixture resembles maple syrup.
4. Pour syrup over oats and stir until oats and nuts are coated.
5. Divide mixture among the two pans and spread into a thin, even layer.
6. Bake for about 45 minutes, or until golden and a bit crispy.
(You can stir the mixture occasionally so that it browns more evenly and the nuts don’t burn. I also rotate my pans between oven racks a few times during the baking process.)
7. Let cool completely before storing in airtight containers or resealable bags.
Monday, July 27, 2009
School's Out and I Have Been in the Kitchen
Since I am in the three weeks that ultimately makes up my summer vacation, I have been spending a lot of time in the kitchen cooking. I have missed cooking. With both of us in school, cooking dinner and anything else was pretty much out of the question. Yesterday, after we got back from our camping trip I made a lot of yumminess. So, without further ado, my recipes from last night (and of course the changes I made to them).

 You can find the recipe here.
In the recipe, it says to refrigerate or freeze the dough and then cut it into slices. I haven't done that any of the times I have made it. I just use my handy dandy cookie scoop and scoop out the dough onto my stoneware cookie sheets and bake them. Because I use stoneware to make my cookies, I have to cook them a little longer. The first batches probably cooked 15 minutes and the later batches cooked for 12 minutes (because the stoneware was already hot).
Here is what I am planning for tonight. I am going to use boneless chicken breasts though, because I am not in the mood to deal with bones.

Five-Cheese Skillet Burgers
Prep Time:
10 min
Total Time:
20 min
Makes:
4 servings, one burger each
What You Need
1 lb. lean ground beef
1 egg
2 Tbsp. ketchup
1 cup KRAFT Finely Shredded Italian* Five Cheese Blend, divided
2 tsp. Worcestershire sauce
1 pkt. SHAKE 'N BAKE Extra Crispy Seasoned Coating Mix
4 hamburger buns, split
Make It
MIX meat, egg, ketchup, 1/2 cup of the cheese, the Worcestershire sauce and coating mix. Shape into four 1/2-inch-thick patties.
PLACE patties in nonstick skillet on medium heat; cover. Cook 5 min. Turn burgers over; sprinkle evenly with remaining 1/2 cup cheese. Cook, uncovered, 5 min. or un
til burgers are cooked through (160°F).
SERVE in the buns.
Now, the first time I made these, I actually had everything on hand to m
ake them. Yesterday though, I didn't have any more Shake n' Bake (or the Kroger brand). What I did have was an old biscuit, so I put it in my tiny food processor and made bread crumbs. I added these to the hamburger mixture until the mixture wasn't sticky anymore. These burgers were definitely good and I have now made them twice. I think that they will become a regular at our house.
Now, on to the side dish. After we went camping, I had a whole bag of red potatoes that I needed to do something with. So here is what I came up with.
Crash Hot Potatoes
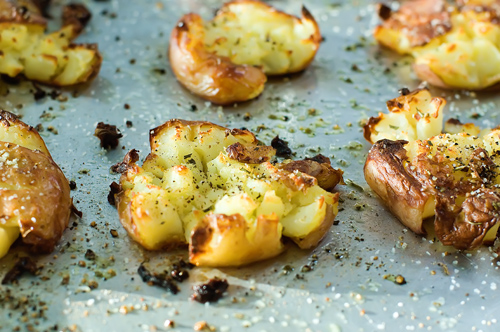
This is yet another Pioneer Woman recipe. You can find the recipe here.
I actually did follow this recipe nearly perfectly. I didn't have the herbs though, so I used some Italian seasoning. It would probably be just fine without anything but the salt and pepper. These potatoes are so yummy. They are soft and crunchy. They did take a long time to make. I'm not really sure how long it took my potatoes to cook in the boiling water, but they pro
bably should have cooked longer. I also don't have a potato masher (I guess I need to add that to my list of things I need for the kitchen), so I used a glass. It worked pretty well.
Now, on to dessert.
After sending Jason to the grocery store, I made yet another Pioneer Woman recipe. I have made these before, so I know they are good.
Oatmeal Crispies
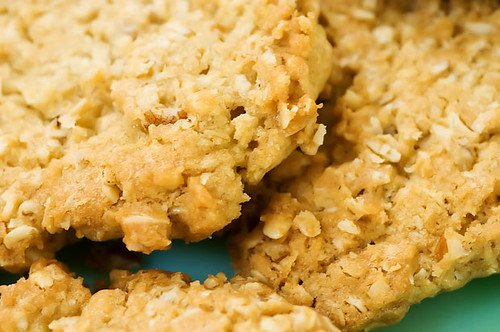
In the recipe, it says to refrigerate or freeze the dough and then cut it into slices. I haven't done that any of the times I have made it. I just use my handy dandy cookie scoop and scoop out the dough onto my stoneware cookie sheets and bake them. Because I use stoneware to make my cookies, I have to cook them a little longer. The first batches probably cooked 15 minutes and the later batches cooked for 12 minutes (because the stoneware was already hot).
Here is what I am planning for tonight. I am going to use boneless chicken breasts though, because I am not in the mood to deal with bones.
Italian Chicken Simmer
Prep Time:
10 min
Total Time:
45 min
Makes:
4 servings
What You Need
1 Tbsp. olive oil
4 chicken leg quarters (1-1/2 lb.), skin removed
1 can (14-1/2 oz.) Italian-style diced tomatoes, undrained
1/3 cup tomato paste
2 small red peppers, chopped
1/4 cup KRAFT Grated Parmesan Cheese
1/2 cup KRAFT Finely Shredded Italian* Five Cheese Blend
Make It
HEAT oil in large nonstick skillet on medium-high heat. Meanwhile, cut apart chicken legs and thighs. Add to skillet; cook 10 min. or until lightly browned on both sides, turning occasionally.
ADD tomatoes and tomato paste; mix well. Stir in peppers; cover. Simmer on medium-low heat 20 min. or until chicken is done (165°F), stirring occasionally.
REMOVE from heat. Stir in Parmesan; sprinkle with shredded cheese. Let stand until cheese is melted.
I will probably make some rice to go with this and if the salad that I bought last week is still okay, we will have that as well.
Friday, June 19, 2009
Some New Recipes
I have been getting the Kraft weekly emails with recipe suggestions for a few weeks now. Since I have been avoiding working on homework today, I decided to open the email up and see what I could find. Well, I found two recipes that I decided to make today.
 * As always I didn't follow directions exactly. Apparently I have trouble with this. I also really like to use my crockpot. So, here is what I did. I put the chicken, water, some of the barbecue sauce and brown sugar into the crockpot. After letting it cook for a while, I shredded the chicken, added more barbecue sauce and some dried onion flakes (I didn't have an onion). I also didn't buy any French bread, so I used some hogie style rolls. I also used cheddar cheese because I like it better than Kraft singles.
 * I was watching "That Thing You Do" while making this, so I made a few mistakes. Luckily for me, this was a very forgiving recipe and still turned out great. One thing that is important to remember is to wait for the crust to cool before putting on the peanutbutter. I forgot and it made it really hard to spread the peanutbutter. This is a very rich dessert, so make sure you have milk (if that is what you like) or water on hand to wash it down.
Now, maybe I should actually get some more work done. Jason has diagnosed me with a severe case of graduate school senioritis. I believe it.
Pulled Chicken Sandwiches
Prep Time:
5 min
Total Time:
25 min
Makes:
4 servings, one sandwich each
What You Need
1 lb. boneless skinless chicken thighs
1 onion, sliced
1/2 cup KRAFT Original Barbecue Sauce
1/4 cup water
1 Tbsp. brown sugar
1 French bread baguette, 16 to 20-inches long (about 10 oz.)
4 KRAFT Singles
Make It
COOK chicken and onions in skillet on medium-high heat 8 min., stirring occasionally.
ADD barbecue sauce, water and sugar; stir. Reduce heat to medium; cover. Cook an additional 7 min. or until chicken is cooked through (165ºF).
REMOVE chicken from skillet. Shred chicken with fork or chop into small pieces. Return to skillet; stir until evenly coated with sauce. Cut baguette crosswise into four pieces. Cut each piece lengthwise in half. Fill with chicken mixture and Singles.
Chocolate-Peanut Butter Mallow Bars
Prep Time:
20 min
Total Time:
38 min
Makes:
32 servings
What You Need!
1 pkg. (2-layer size) devil's food cake mix
1/2 cup (1 stick) butter, melted
2/3 cup milk, divided
3/4 cup creamy peanut butter
1 jar (7 oz.) JET-PUFFED Marshmallow Creme
1/2 cup PLANTERS Salted Peanuts
6 squares BAKER'S Semi-Sweet Chocolate, coarsely chopped
Make It!
HEAT oven to 350°F. Mix dry cake mix, butter and 1/3 cup milk until blended; press 2/3 onto bottom of 13x9-inch pan. Bake 12 to 14 min. or until center is almost set; cool 3 min. Meanwhile, mix peanut butter and remaining milk.
SPREAD peanut butter mixture onto crust; top with small spoonfuls of the marshmallow creme and remaining cake mixture. Sprinkle with nuts and chocolate; press gently into cake mixture.
BAKE 18 min. or just until center is set. Cool completely before cutting into bars.
Now, maybe I should actually get some more work done. Jason has diagnosed me with a severe case of graduate school senioritis. I believe it.
Thursday, May 28, 2009
Spanish Rice (or is it Mexican Rice? I have no idea.)
Yesterday I made my version of Spanish rice. I took a recipe from thepioneerwoman.com and made it my own. Why? Well, first of all, I like to, and second, I didn't have all of the stuff that I needed to make the real recipe, but what I ended up with was excellent. So, here it is:
Spanish Rice
1/2 cups white rice
3 cups chicken broth
1 or 2 tomatoes, diced
1 onion diced (I used onion flakes, because I didn't have an onion)
diced garlic (I used dried)
1/2 package taco seasoning mix (I was too lazy to get out all of the other spices and make my own)
canned veggies (normally I would just use black beans and leave it at that, but I didn't have any, so I used kidney beans and corn. I drained the corn and drained and rinsed the kidney beans.)
1. Use the chicken broth to cook the rice in. (I'm not going to go into much more detail, just cook the rice)
2. In a pan cook the tomato, onion, and garlic (If you are super lazy, buy the canned tomatoes with garlic and onion. They will work just fine.)
3. Add the taco seasonings to the tomatoes and let the mixture cook down.
4. Mix veggies into tomato mixture to heat up.
5. Mix rice and veggie mixture together (I usually mix it all up in a big bowl)
6. enjoy!
I'm sure this recipe is not very clear, but if you can figure it out, it is super good. It is one way I can get Jason to eat beans. He doesn't seem to mind if they are mixed in things. You can find the original recipe that I adapted here. If I haven't posted it before, the Mexican lasagna in this recipe is also awesome. You definitely have to half the recipe, because it makes a ton.
Monday, May 25, 2009
Strawberry Ice Cream
So today was Memorial Day and we had a picnic with our Journey group from church. I made ice cream. I love homemade ice cream. It is like the best stuff ever. Since I was at my parents this morning without my usual ice cream recipe, my mom found one for me in her Southern Living cookbook. If it is by Southern Living, you can be sure it will be good. This ice cream started with making a custard. I was a little wary of this, because it contained eggs, but it all turned out okay. One recommendation that I have though is that while making the custard, after putting in the sugar mixture, stir constantly. I burned mine some by not doing this. Here is the recipe:
Strawberry Ice Cream
Strawberry Ice Cream
2 c sugar divided
1/4 c all purpose flour
dash of salt
3 c milk
4 lrg eggs, lightly beaten
3 c pureed fresh strawberries
3 c whipping cream
1 TBS vanilla extract
2 tsp almond extract
- combine 1 1/2 c sugar, flour, and salt; set aside
- heat milk in top of double boiler until hot; add a small amount of milk to sugar mixture, stirring to make a smoth paste. Stir sugar mixture into remaining milk; cook over medium heat, stirring constantly, until slightly thinckened. Cover and cook 10 minutes, stirring often.
- stir about 1/4 of hot mixture into beaten eggs; add remainging hot mixture. Cook one minute stirring constantly, Cool.
- combine strawberries, remaining 1/2 c sugar, whipping cream, and flavorings; stir into custard
- pour into freezer container of a 1 gallon ice cream freezer. Freeze according to manufacturers instructions. Mixture does not need ripening.
Yield 3 quarts.
Enjoy some this summer!
Yield 3 quarts.
Enjoy some this summer!
Thursday, May 14, 2009
Kraft Budget Wise dinner
I finally got around to going grocery shopping and getting the stuff I needed for the 1 bag 5 dinners thing at Kraft. You can find it here. I did one of the chicken and beef bags. Since I am home alone tonight, I got to choose what I wanted to make and of course I did not start with Monday's meal. I didn't even do Thursday's because today is Thursday. I made Tuesday's meal of chicken fajitas. Before I talk about that though, I wanted to mention the grocery trip. I had a very short list, and if I hadn't had to buy anything else, my groceries probably would have fit into one bag. I was really proud of myself for this trip, because I had about $50 to spend and I spent $50.02. I saved over $12 with coupons and my Kroger Plus card. All in all it was a good trip.
Now to the chicken fajitas. The recipe called for stir fry veggies. I grabbed a bag from the produce section and I really think that what I had would be better for Asian stir-fry, but I don't like peppers and onions, so it worked for me. As I was cooking, I thought it smelled and looked more like an Aisan meal than a Mexican meal. I still liked it though. I put cheese and sour cream on my tortillas with the chicken and veggies. All in all, it was a decent meal for me. I have no idea what Jason will think about it.
Now I am off to either clean the kitchen or work on my portfolio. Neither one of these options sounds really good to me right now.
Monday, May 4, 2009
A Pretty Good New Find
I found something yesterday that I think we will be trying in the next few weeks. Kraft has posted 1 Bag, 5 Dinners recipes and shopping lists. You can find them here. I have a hard time planning ahead, especially with both of us in school two nights a week. The other nights, I just don't really feel like making anything amazing and the one night that Jason is in class when I am not, I don't want to go to all the trouble of cooking for myself. Maybe I'm just lazy, I don't know. Anyway, I can follow these basic recipes and buy basic ingredients and have five meals. I did notice that they did not include sides, the shopping list was for only main dishes, so if you are anything like me and do not have a lot of extra stuff just sitting around, you will want to include on your list sides to go along with the main dishes. I will probably have to edit some of the recipes/menus, because there are just something we don't like. I will try to remember to report back and tell you how that goes.
Sunday, April 26, 2009
A Couple Yummy Recipes
It has been a while since I posted some recipes, so I thought I would put some up there today. All of these are from The Pioneer Woman and are so yummy. She definitely doesn't do low fat. :)
Here we go:
Marlboro Man's Second Favorite Sandwich
She doesn't have this one nice and typed up for me to copy and paste. Basically, the sandwich is chicken breast with lemon pepper seasoning, pepper bacon, and cheese. The cheese and the roll/bun are up to you. I used wheat hogie-style rolls and colby cheese. I also didn't want to fork out $6 for the pepper bacon, so I used regular. If you are making this for more than two, I would totally recommend the pepper bacon. I cooked these on the grill, because Jason had been craving grilled chicken. They were definitely a hit.
Spreads
1 cup brown sugar
1 cup margarine
1 egg
2 cups flour
1/2 teaspoon salt
1 teaspoon vanilla
6 to 8 ounces chocolate chips
Preheat oven to 350 degrees.
Mix together brown sugar and margarine. Add egg and mix together. Add flour, salt, and vanilla, and mix together well.
Spread dough onto cookie sheet to a thickness of 1/4 to 1/2-inch.
Bake for 15 to 20 minutes, or until slightly brown.
Sprinkle chocolate chips evenly over the top. Return to oven for 1 minute.
Remove and spread melted chips over the top.
Cut into squares.
A couple things on these. I would totally use a mixer! I had a lot of trouble getting the butter to mix in with the brown sugar. It could have been that I was using butter and not margarine, I don't know, but it was not easy. Also, it seems to me that real butter is okay to use. It was all I had, so I used it. I think these are good, quick any time cookies. They were easy to mix up and really tasty.
Another one I can't copy, but that is okay. Just let me tell you that these are excellent. The recipe seems daunting at first, but after starting the process (and I do mean process) it is fairly straight forward. I made these with Whitney from my Bible study and neither of us is a hugely experienced cook. Instead of the maple icing (which looks wonderful) we used store bought cream cheese frosting. This worked really well as well. The recipe makes a ton, so be prepared to share or freeze what you can't eat.
I guess you can tell where a lot of my inspiration comes from. I like a lot of Pioneer Woman's recipes and I like to share them with everyone else. :)
Update on our lives:
Jason bought a motorcycle this weekend. He is really excited about it. I have two weeks of classes left. I also got the due date for my portfolio and the date for my orals this past week. I have about two months to get my portfolio finished (started as well). I am a little worried, but I have a plan to get it done. I went to the doctor again last week to draw more blood. I really think my levels will be down this time. I really hope so. It is hard having to sit in there, not that I am jealous of all the pregnant ladies, but because it brings it all back. I finally came up with a non-crazy way to memorialize the brief life of our little pumpkin. I am planting two rose bushes in front of my house and I am going to find a little statue of a child to sit by them in memory of the little one that was taken from us too early. This is a way better idea than the tattoo that I contemplated in the days after we lost our pumpkin. :)
Well, Jason has made it home in hopefully one piece, so I am going to get dinner ready for him.
Tuesday, March 24, 2009
Yummy recipe
Every once in a while I get the Kraft Food and Family magazine. This issue seemed to have a lot of recipes for cheesecake type desserts. Since by Bible study group was supposed to come to my house on Monday, I decided to make one of the recipes. Here it is:

Peanut Butter Cheesecake Brownie Babies
Prep Time:
20 min
Total Time:
50 min
Makes:
20 servings, 1 brownie each
What You Need!
1 pkg. (19 to 21 oz.) brownie mix (13x9-inch pan size)
1 pkg. (8 oz.) PHILADELPHIA Cream Cheese, softened
1/3 cup sugar
1 egg
1/4 cup peanut butter
1/2 tsp. vanilla
1-1/2 cups thawed COOL WHIP Whipped Topping
20 maraschino cherries
Make It!
HEAT oven to 350ºF.
PREPARE brownie batter as directed on package. Spoon into 20 paper-lined muffin cups.
BEAT cream cheese, sugar, egg, peanut butter and vanilla with mixer until blended. Spoon 1 rounded Tbsp. into center of batter in each cup, pressing down slightly into batter. Bake 30 min. or until centers are set. Cool.
SERVE topped with COOL WHIP and cherries.
Kraft Kitchens Tips
Variation
Prepare using PHILADELPHIA 1/3 Less Fat Cream Cheese and COOL WHIP LITE Whipped Topping.
Cheesecake Brownie Babies
Prepare as directed, omitting peanut butter.
Oh my goodness, these things are delicious. We didn't have small group at our house, so Jason and I have eaten way too many of them. They are like a Reeses peanut butter cups. Anyway, I really recommend this recipe. I think it is awesome. I didn't include the nutrition info, because I just don't really want to know. If you have to know, you can find the recipe here.
Not much else is going on in the world of Jason and Tracie. Jason finished his first class at North Metro. He is now a Photoshop master. I registered yesterday for my last semester at Berry. I am so ready to be done. This semester has been difficult and exhausting. I'm sure it is not just school, but a combination of work, school, and everything else. It is a little too much for me right now, but I just have a little further to go. I can make it.
Sunday, January 11, 2009
Happy Birthday Jason!
In honor of Jason's 26th birthday, I thought I would post the recipe for his favorite cake. Jason doesn't really like a lot of sweet stuff, so this cake is right up his ally. It doesn't have frosting. It uses Cool Whip instead. Now, this is a family recipe, so my directions are not going to be all nice and put together, but I will make it better than how it is written on my recipe card.
So, in honor of Jason's birthday and the two people who gave me the recipe (Jenny and Granny June) here is:
Strawberry Cake
1 box strawberry cake mix (make as directed on box)
1 cup sugar
1 1/2 cups water
3 Tbs. corn starch
3 oz. box strawberry Jello
1 box sliced frozen strawberries (defosted)
1 container Cool Whip (I usually get the bigger one, because it is better to have too much than too little)
1. make strawberry cake as directed in box. Bake in 13x9 sheet pan.
2. once cake is out of the oven, let it cool while mixing the sugar, water, cornstarch, and Jello in a pan over medium-high heat. Boil this until thick. (all I can say is that you will notice a difference. It becomes kind of like a syrup)
3. poke holes all over cake. Don't worry about being neat. The more holes the better, and any crumbs will be covered over with Cool Whip. I tear mine up pretty good.
4. pour the Jello mixture over the cake
5. cool cake in refrigerator
6. once cake is cool, pour strawberries over the cake and top with Cool Whip
7. If this is your birthday cake, put the appropriate number of candles on the top
8. serve and enjoy
This is a very yummy cake that would be very refreshing in the spring or summer. I can't say I have ever had it at that time though since my wonderful husband was born in January.
Now I have to get ready for his party. Chinese food and strawberry cake. Together at last!
Friday, January 9, 2009
Miles Today
Today has been a beautiful day. It started out cold, but it is in the 60s or so now. Even though it was so nice today, I didn't even think about going to ride my bike. When I got home today, all I wanted was a snack (apples and peanut butter) and to play Tetris. Jason got me a Tetris game for Christmas and it is a lot of fun to play. Well, while I was eating my snack, Jason called me and told me that I should go ride my bike. I did and I rode about 6 miles. It might be closer to 5, but, regardless, that is still a lot. I am a little wary about riding on the SCT by myself, because a few years ago a lady was killed on the trail in my county, but I figured there would be enough people out today that I should be fine. The only weird thing was that a guy in the parking lot told me that I should be careful riding by myself and that I should get mace. Maybe I will look into that. There just isn't much place to put stuff like that in my ridiculous bike pants. :)
Last night was Jason's first night of class, so I was on my own. I decided that I wanted to make something good and different for dinner. I went to Kroger and wandered around looking for something yummy for supper. As I was passing the organic aisle, I noticed that they have a ton of soups in boxes. This led me to find a package of Pad Thai ingredients. I love Pad Thai and my middle of nowhere Kroger doesn't carry the brand I used to buy (not organic), so I haven't made it in forever. They also haven't carried my bean sprouts either. Anyway, I grabbed that and from there tried to figure out what I wanted to put in it. Usually I put chicken, but since it was just me, the world was open to me. Also, I didn't want to buy a package of chicken. Underneath the Pad Thai was some tofu. Again, since I was just making it for me I put that in my basket. Then I went in search of bean sprouts. Low and behold, they had my sprouts (mung bean sprouts for those that don't know). I got those and some peanuts and made my way to checkout and then home. All in all, my foray into organic/all natural cooking and tofu was a success. I really enjoyed my Pad Thai and Jason even ate some, tofu and all. Now I have to figure out what to do with the other half of my tofu.
Last night was Jason's first night of class, so I was on my own. I decided that I wanted to make something good and different for dinner. I went to Kroger and wandered around looking for something yummy for supper. As I was passing the organic aisle, I noticed that they have a ton of soups in boxes. This led me to find a package of Pad Thai ingredients. I love Pad Thai and my middle of nowhere Kroger doesn't carry the brand I used to buy (not organic), so I haven't made it in forever. They also haven't carried my bean sprouts either. Anyway, I grabbed that and from there tried to figure out what I wanted to put in it. Usually I put chicken, but since it was just me, the world was open to me. Also, I didn't want to buy a package of chicken. Underneath the Pad Thai was some tofu. Again, since I was just making it for me I put that in my basket. Then I went in search of bean sprouts. Low and behold, they had my sprouts (mung bean sprouts for those that don't know). I got those and some peanuts and made my way to checkout and then home. All in all, my foray into organic/all natural cooking and tofu was a success. I really enjoyed my Pad Thai and Jason even ate some, tofu and all. Now I have to figure out what to do with the other half of my tofu.
Thursday, January 1, 2009
New Year's Yumminess
Jason and I had quite a Christmas week. It started Christmas Eve and didn't really end until New Year's Eve. Needless to say, we both did not want to go out for New Year's Eve. I did want to have some fun though. I made a bunch of appetizers and set them up on the table for us to much on.
Here is the menu:
chicken wings
fruit with fruit dip
carrots with ranch dressing
hot artichoke dip
cheese and crackers
Here are the recipes for the fruit dip and the artichoke dip. I got them from my absolute favorite cookbook, Betty Crocker's Bridal Edition Cookbook. My mother-in-law got it for me when we got married.
I will include the changes I made to the recipes as well (I can't leave well enough alone).
Creamy Yorgut Fruit Dip
8 oz cream cheese, softened (I didn't let mine soften, so I beat it in the mixer a little longer)
1 container orange yogurt (I couldn't find orange yogurt, so I used vanilla)
1/2 cup orange marmalade
1/8 tsp. ground nutmeg (I don't have an 1/8 tsp measurer, so I just put a couple dashes in)
2 Tbs coarsely chopped pecans [optional] (I actually really liked the nuts in this dip)
Cut up fruit (I had apples, grapes, and pineapple)
1. beat cream cheese in medium bowl with electric mixer on medium speed until creamy. Beat in yogurt, marmalade, and nutmeg until smooth. Serve immediately or cover and refrigerate for 30 minutes.
2. spoon mixture into serving bowl. Top with chopped pecans. Serve with fruit.
I left mine beating in the mixer on medium for a while. It made it fluffy. I did this mainly because I didn't soften the cream cheese, but I really liked the texture after it had mixed awhile.
Hot Artichoke Dip
1/2 cup mayo (you can probably use Miracle Whip/grossness too, but I don't like it, so I didn't)
1/2 cup grated Parmesan cheese (I used shredded)
4 medium green onions, shopped (I don't really like onions, so I just used some onion flakes)
14 oz can artichoke hearts, chopped
crackers or bread
1. Heat oven to 350 degrees
2. Mix mayonaise and cheese in small bowl. Stir in onions and artichoke hearts. Spoon in 1 qt. casserole.
3. Cover and bake 20 to 25 minutes. Serve warm.
I mixed everything in the corningware dish that I cooked it in. It saves me from having to watch a bunch of dishes. After I mixed the dip together I thought it looked a little bland (maybe this would have been helped by the green onions) so, I sprinkled bread crumbs on top of the casserole. It didn't affect the taste, but I thought it made it look pretty.
Subscribe to:
Posts (Atom)